Tuesday, July 17, 2012

Yayyy!! Release Day!!

Hi Everyone :) Welcome to Deasy Designs Digi Blog. 
From now on, on this blog I will posting my new digi, tutorial, and sample projects.
Today I will release my 2 new digital stamps, here we go...

The first one it's called FRAME IT. I make it because it can be use for mix and match with my other digi or other stamps. So many possibilities. You can add some sentiments, an image on the window, an image on the frame, the door can be open and closed, there's cat on the floor and perfect for layout too.


The second is called SWEET TREATS consists of cute waitress girls and many adorable accessories also table cloth too. You can make many cute scene. This set also can be combine with the FRAME IT set.


If you want to buy my digital stamps, this two set is available now. Please check my online store HERE

I will make giveaway for two days. Today I will giveaway the FRAME IT set for 2 people.
Tomorrow, I will giveaway the SWEET TREATS set for 2 people also.

All you have to do is :
1. Follow my blog ( on Join this site button )
2. Comment on this post tell me what you think about my new digital stamps
3. Like us on Facebook
If you can spread out about this post with twitter, facebook, I will really appreciate it :)

I ask some talented designer to make some cards using my new digi stamps. Thank you so much for your supports by making me this sweet and pretty cards!!

So here it is :


See you tomorrow, I will share another cards for you and GIVEAWAY for SWEET TREATS set.
Thank you for viewing my blog. I hope you like my new digis :)

Big Hugs,
Deasy

Wednesday, July 11, 2012

Resize and Flip my Digital Stamps on Photoshop

Hi :)
Today I'm back with tutorial about How to resize and Flip my digital stamps on Photoshop.
I'm using Photoshop CS5, but I think this tutorial is basic and same as any Photoshop version.

1. On the toolbar, on the upper left there's MOVE TOOL, we can move an image to another image using this tool.

On the below left there's ZOOM TOOL, we can zoom in and zoom out by also press ALT.
Or just press "Ctrl + " to zoom in and " Ctrl -" to zoom out.
On the Macintosh "Ctrl "you can change it by press "Apple"

There's HISTORY...if your history didn't show up, try to look WINDOW and find History.
History is the step from your action...so you can come back to the step you want.

LAYER= Photoshop working on layers. If your Layer didn't show up, try to look WINDOW and find Layer.


2. Open the file of the images by click File - Open and pick the images that you want to open


3. We will make a paper to print by Click File- New. If the paper size is A4 change it Width=210mm, Height=297mm, Resolution= 300 pixel/inch Click OK


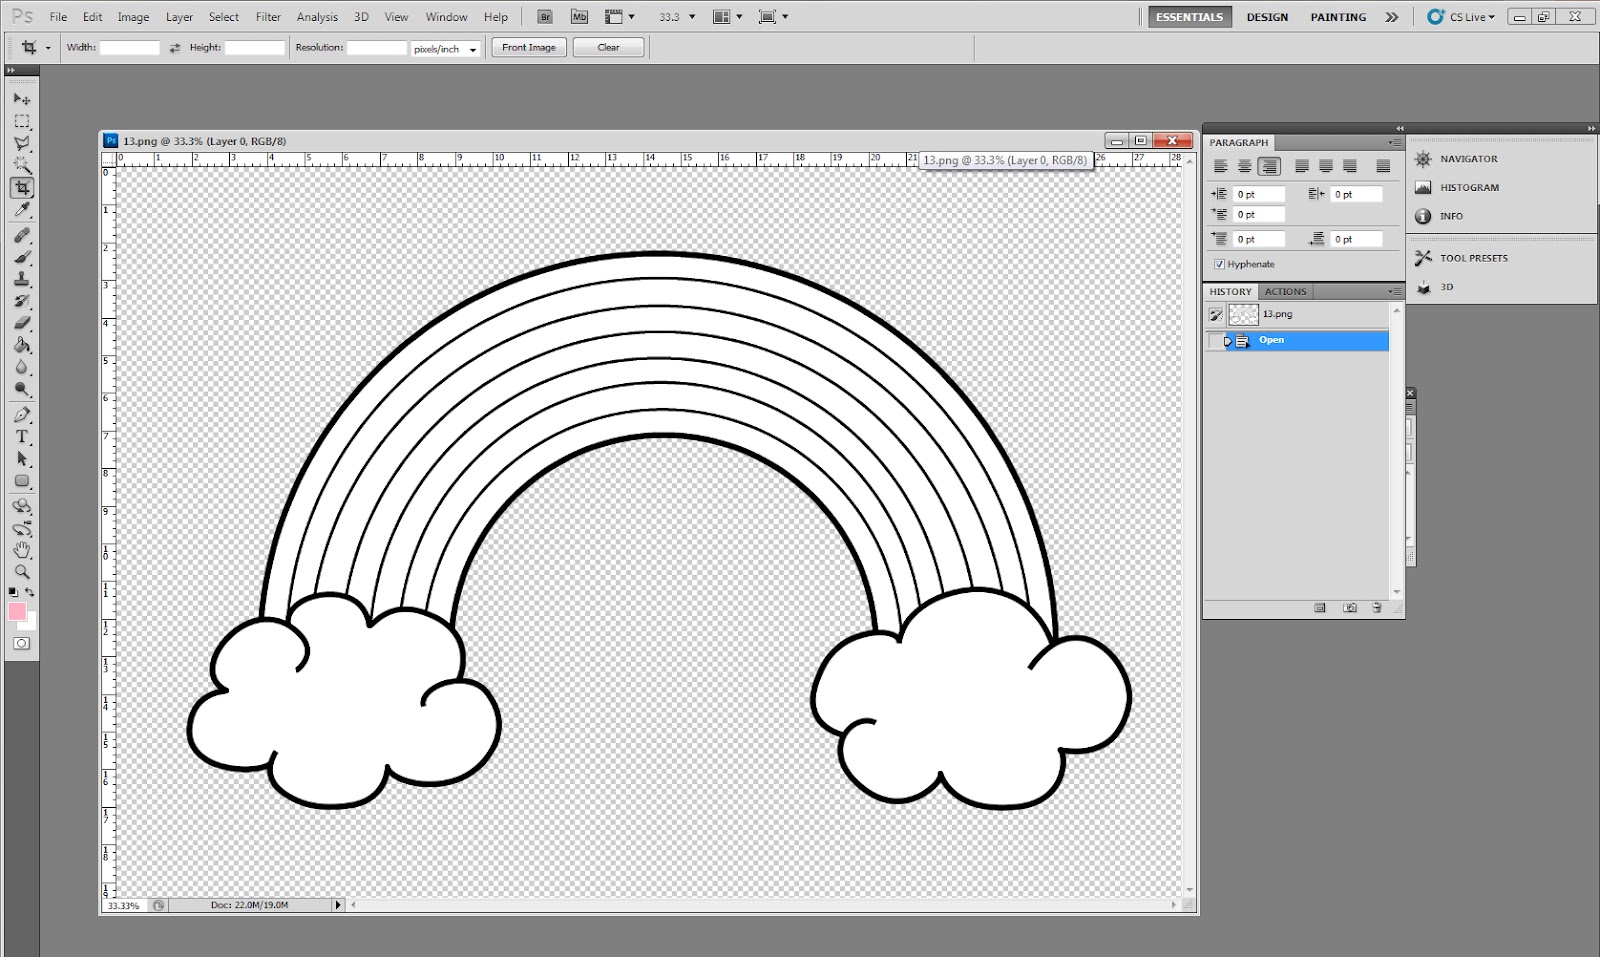
4. We will have 2 image like this. One is the image and one is the paper that we want to print.


5. Using MOVE tool. Drag the image ( rainbow) to the paper that we want to print, the paper will turn like this :


6.The rainbow look too much bigger right? We can resize it to the size we want. The rainbow is on LAYER 1. So we must click the LAYER 1 to edit the rainbow and press "Ctrl T" or "Apple T" on Mac.
The picture will look like this. Press Shift on the corner ( to help your image not have distorsion) and you can resize it to more smaller that you want. You can see the size by looking the ruler too :). After that you can press Enter.


7. You can add other images using the step like above. After you add another image, the fairy image is on layer 2. If you want to edit the fairy, you must pick Layer 2. If you want to edit the rainbow, you must pick Layer 1.


8. I work on layer 2 to edit the fairy so I can combine the rainbow and the fairy together. And here is the look after I resize the fairy


9. I want to mirrow my fairy, so I pick Layer 2 and press " Ctrl T" and left click, there's option and pick Flip Horizontal.

10 Ta taaaa......here's my fairy look . You can add many images as you want on the paper. Use MOVE TOOL to arrange the images and don't forget to pick the Layer that you want to edit or drag, because if many images it will be many layers too. By doing this, you can print easily and not waste your paper.

I'm sorry my English is not good enough.
I hope you understand this tutorial and please tell me is it worked for you or not.
I will make another tutorial about how to change color of my digital stamps outline.

Have a nice day everyone!!

Hugs,
Deasy

Wednesday, July 4, 2012

Cards from Joe Shien Shien

Hi :) I'm come back today with cards from my friends, Joe Shien Shien.
Couple days ago, Cathy Fong came to my town, and we play together at my home.
We try to coloring with Copic together and Joe Shien Shien making me this 2 beautiful cards.
I can't wait to share it with you...

Here it is :


Very fun, cute and her coloring is amazing right? You can find my digital stamp Little Rossie HERE. Thank you Joe Shien Shien....I LOVE your cards :)

I'm working on my new digi right now...I hope it will finish soon and sharing it with all of you!!

Hugs

Deasy

Monday, July 2, 2012

Cards from Emily Leiphart :)

Hi :) I'm really happy today for sharing cards from Emily Leiphart. She's very talented artist and I'm a huge fans of her works. You can check out her blog at HERE. She making me 4 cards!!! WOW...I'm so excited!! This is her fabulous cards using Deasy Designs Digital Stamps :


Thank you Emily, for making me this super cute cards! I'm very honored :)
Have a nice day everyone!!

Hugs,

Deasy

Saturday, June 30, 2012

Deasy Designs Launch Party!!!

Hi....:)
Welcome to Deasy Designs Digital Blog.  Today it's Deasy Designs Clear Stamp launch party. The clear stamp and the website is officially released now. We hope you like our new look :)
I opened the digital shop in 2012.  And a little while ago, me and Laurel decided to join forces and the Deasy Designs Clear Stamp company was born!
We have 3 clear stamp sets debuting today – one is based on one of my digital sets and 2 brand new, never before seen sets. 


This is the new set  and my cards using it :


Our Heroes :


Floral Fusion

Aero Boy


I really hope you like our debut stamp sets and I'm looking forward to seeing lots of our crafty friends creating with them in the weeks and months to come!

Please visit HERE for clear stamp blog and HERE for Clear Stamp Store

And last but not least... how about a giveaway!!!

We have one of each of the new stamp sets to giveaway and all you have to do is leave a comment on the clear stamp blog for a chance to win!!!!
We will close the giveaway on Friday July 6th at 11:59pm EST.

And a huge thank you to all of you for stopping by today and sharing in our excitement as we begin this new adventure!


Hugs,


Deasy